
Context
iJewel3d developed a JavaScript library that allows developers to embed high-fidelity, interactive 3D graphics into web applications. It simplifies the integration of 3D models into websites, enhancing user experience with photorealistic visuals and smooth interactivity. Built on top of three.js, WebGi ensures efficient and cross-platform rendering of 3D content across different devices and browsers.
In the context of ShapeDiver, the iJewel3d integration is particularly interesting when rendering jewelry because of its dedicated rendering algorithm for gemstones such as diamonds.
See an example of a ShapeDiver App making use of the iJewel3d viewer here.
How to use the iJewel3D viewer
At the moment, the iJewel3D integration is only available in Apps, not directly in the ShapeDiver platform's model view page and iframes. Read more here about how to open your ShapeDiver models as Apps.
Once you have opened an App from one of your models, it is possible to switch between the standard ShapeDiver viewer and the iJewel3D viewer by switching the main part of the URL to ijewel3d:
However, since the iJewel3d viewer handles materials in its own way, doing this switch with a standard ShapeDiver model will result in the same white material for all objects in the scene:
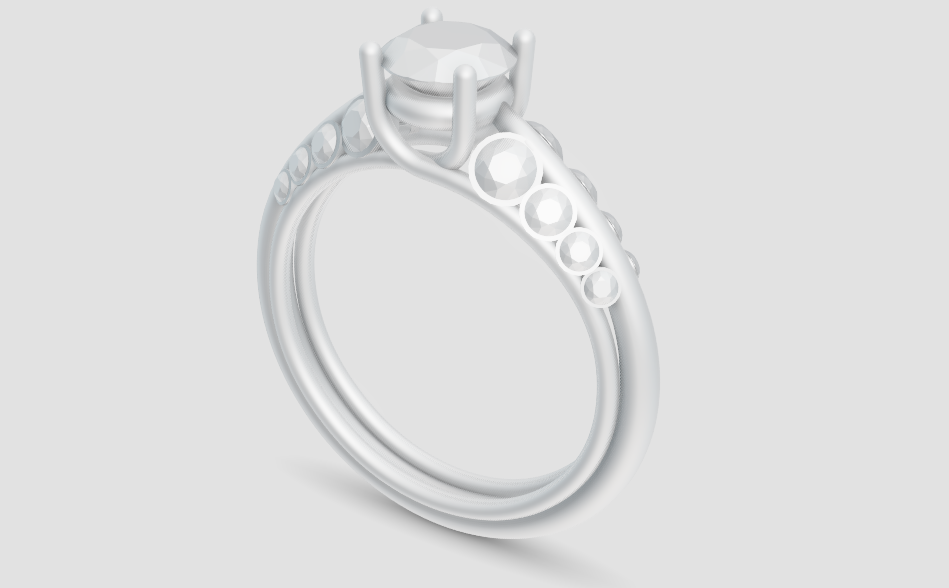
The specific iJewel3d materials need to be defined and referenced in Grasshopper.
Define the a scene
As a different viewer is used then the ShapeDiver standard viewer, the settings of the standard viewer are not supported there. You can set up your own settings in the iJewel3D playground and provide these scene settings as a part of the URL.
In this video, you can see how to adjust the scene and save the scene file.
There are a few things to consider here:
-
Load the model first as a glb (or use one of the default models provided), then load an existing scene file if you you already have one
-
Don’t change any settings from the left side menu as this might change multiple settings at once
-
Don’t drop in an environment map directly on the canvas, as this would embed it into the resulting file.
-
The camera position when you save the file is used.
Once you are finished and have downloaded the scene file, upload it to a file hoster of your choice and provide it as the query parameter webgiScene:
https://appbuilder.shapediver.com/v1/ijewel3d/latest/?slug=MODEL_SLUG&webgiScene=LINK_TO_SCENE
How to setup iJewel3D materials in Grasshopper
IJewel3d offers a sandbox page where one can tweak the many properties of the materials they offer. You can try it here: https://playground.ijewel3d.com/v2/
On the left, it is possible to switch between different families of materials, in particular metal and gemstone ones. On the right, and after clicking on an object in the scene, go to Picking > Picker and find the “Physical Material” section of the object you selected. In this section, many properties can be fine-tuned.
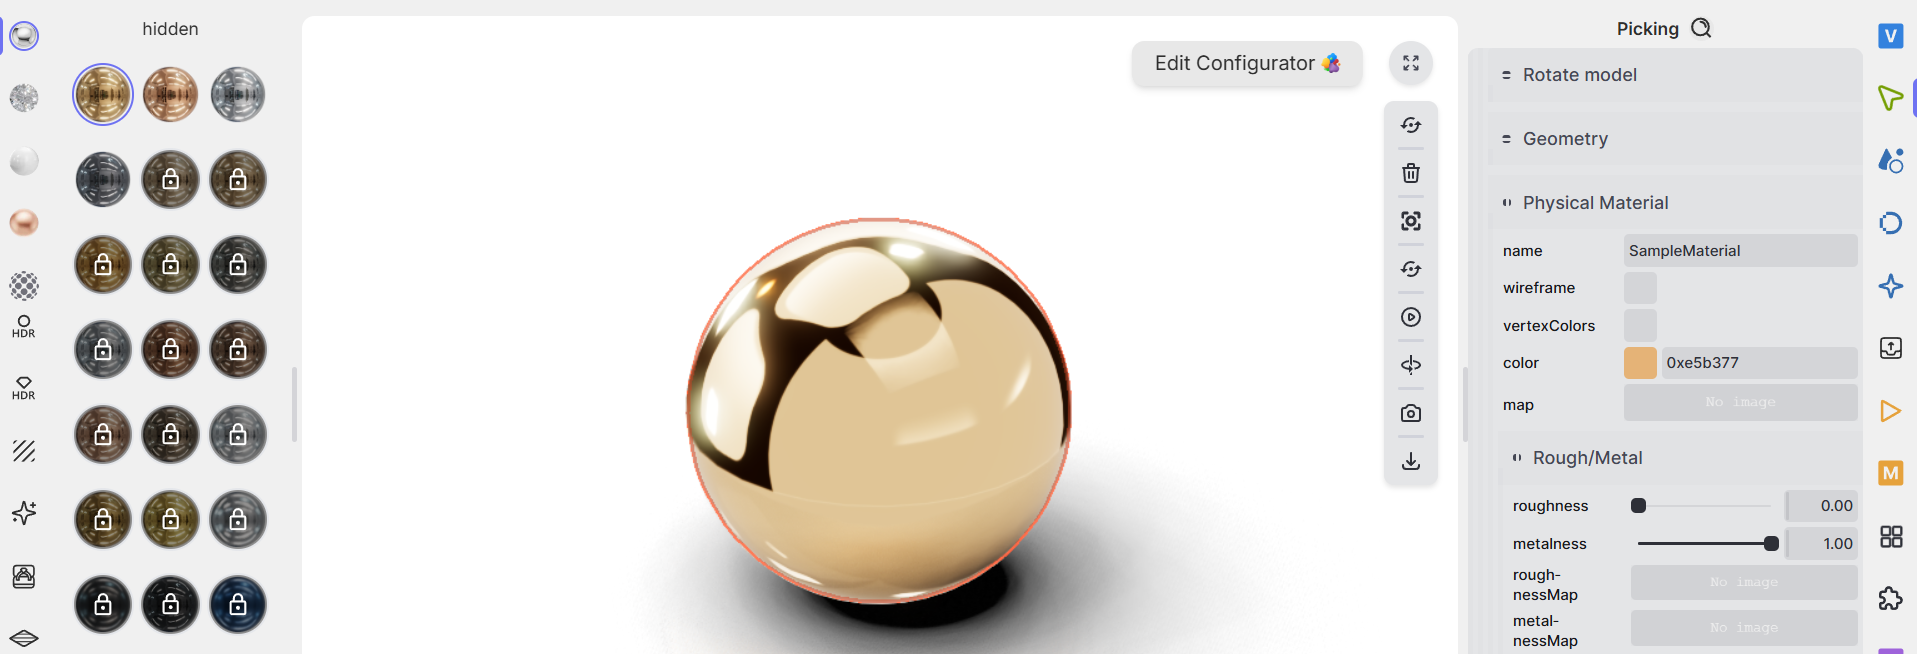
When you are done setting up a material, it is possible to export it as a .pmat file by clicking on the “Download pmat” button at the bottom of the Physical Material section.
The pmat file contains a json object with a material definition, and that’s what we need to start connecting the dots in Grasshopper. Here is an example exported material definition:
{
  "metadata": {
    "version": 4.6,
    "type": "Material",
    "generator": "Material.toJSON"
  },
  "uuid": "d255eefb-6b8a-4848-be59-806c26752bb7",
  "type": "MeshStandardMaterial2",
  "name": "example_mat",
  "color": 15053687,
  "roughness": 0,
  "metalness": 1,
  "sheen": 0,
  "sheenColor": 0,
  "sheenRoughness": 1,
  "emissive": 0,
  "specularIntensity": 1,
  "specularColor": 16777215,
  "clearcoat": 0,
  "clearcoatRoughness": 0,
  "iridescence": 0,
  "iridescenceIOR": 1.3,
  "iridescenceThicknessRange": [
    100,
    400
  ],
  "anisotropy": 0,
  "anisotropyRotation": 0,
  "envMapIntensity": 1,
  "reflectivity": 0.5,
  "transmission": 0,
  "thickness": 0,
  "attenuationDistance": 0,
  "attenuationColor": 16777215,
  "side": 2,
  "depthFunc": 3,
  "depthTest": true,
  "depthWrite": true,
  "colorWrite": true,
  "stencilWrite": false,
  "stencilWriteMask": 255,
  "stencilFunc": 519,
  "stencilRef": 0,
  "stencilFuncMask": 255,
  "stencilFail": 7680,
  "stencilZFail": 7680,
  "stencilZPass": 7680,
  "fog": false,
  "userData": {
    "cloneId": "0_1_1",
    "rootPath": "https://assets.ijewel.design/v3/materials/metal/polished/metal-rosegold-polished.pmat",
    "gltfExtensions": {},
    "cloneCount": 0,
    "uuid": "d255eefb-6b8a-4848-be59-806c26752bb7"
  },
  "textures": [],
  "images": []
}
Here are the steps to use this material in Grasshopper:
1) Define the materials database
a. Copy the exported material definition(s) to a text panel in Grasshopper.
b. Parse it as a JSON object using the Parse JSON component.
c. Create a new JSON object with one or several keys (materials names) linked to corresponding material definition(s).
d. Send the final JSON object to a Direct Data Output component called “MaterialDatabase”.
See the first three steps below, in an example where we create a material database containing two materials named example_mat1 and example_mat2:
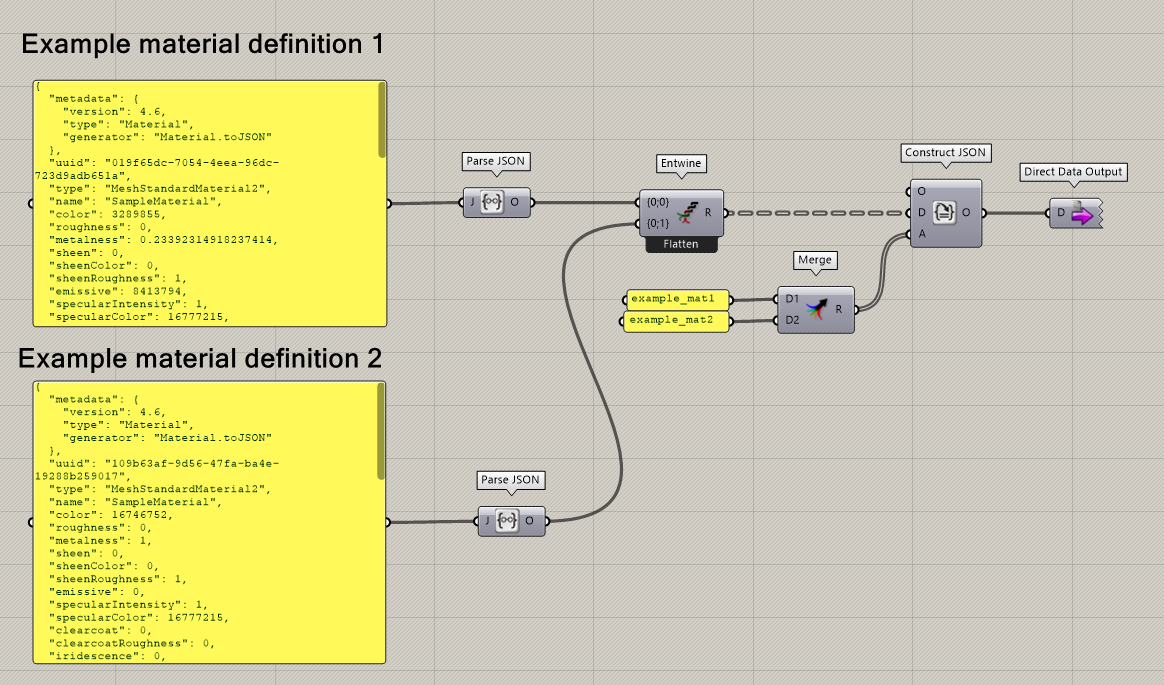
The final JSON object looks like this:
{
  "example_mat1": {
    "metadata": {
      "version": 4.6,
      "type": "Material",
      "generator": "Material.toJSON"
    },
    "uuid": "019f65dc-7054-4eea-96dc-723d9adb651a",
    "type": "MeshStandardMaterial2",
    "name": "SampleMaterial",
    "color": 3289855,
    "roughness": 0,
    "metalness": 0.23392314918237414,
    //and the rest...
  },
  "example_mat2": {
    "metadata": {
      "version": 4.6,
      "type": "Material",
      "generator": "Material.toJSON"
    },
    "uuid": "109b63af-9d56-47fa-ba4e-19288b259017",
    "type": "MeshStandardMaterial2",
    "name": "SampleMaterial",
    "color": 16746752,
    "roughness": 0,
    "metalness": 1,
    //and the rest...
  }
}
2) Reference the materials in the displayed geometry
Now we can reference materials from this database in our displayed geometry.
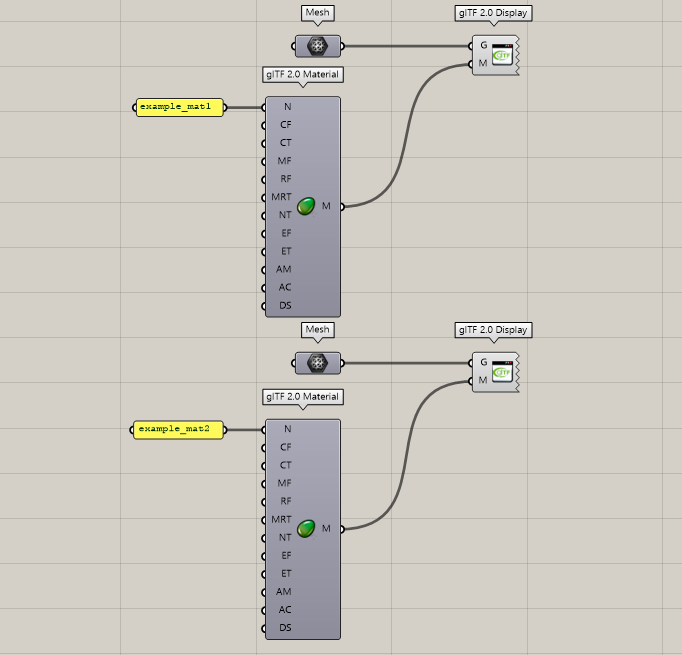
a. Make sure the geometry you want to bind with an iJewel3d material is displayed using a glTF 2.0 Display component.
b. Connect the display component to a glTF 2.0 Material component, and input the name of the desired material from the database. Note that the other inputs of the component will be ignored! Only the iJewel3d material definition will be used.
See the results of step 2 for our example, where we display two objects with the two materials defined in step 1:
Note that a single display component can be used by sending a tree of objects and a list of materials (read more here).
The steps above are only a workflow suggestion. It would also be possible to define the final JSON objects manually or to import them in Grasshopper using an Import Text component. One can also imagine the definition of a big material database that is processed to extract the materials specifically needed in the context of one ShapeDiver model.
3) Upload your model to ShapeDiver
After the upload, follow the steps from the first section to open the app and switch to the iJewel3d viewer.