
You’ve built your logic, perfected your parameters, and your Grasshopper definition is running smoothly. But in the world of online configuration, creating a parametric model is only half the battle - visual impact is what closes the deal.
This guide breaks down the essential pipeline for achieving professional-grade visuals in the ShapeDiver viewer. It is designed for intermediate users who are already familiar with Grasshopper and the ShapeDiver ecosystem. We aren’t building from scratch here; instead, we are focusing on the "last mile" of development.
If your model lacks that "premium" feel, the following strategies will help you bridge the gap between a raw CAD preview and a stunning, interactive web experience.
Geometry Preparation
Before working on materials or lighting, start with the foundation: geometry. Clean geometry results in predictable shading and more believable materials in the ShapeDiver viewer. Issues such as dense meshes, unwelded vertices, or small intersecting faces often become visible once the model is rendered online.
Meshes with Intention
Everything displayed in ShapeDiver is rendered as a mesh.
This means that, sooner or later, your geometry will be converted to meshes—either explicitly by you, or automatically by the system. There are two main ways to approach this, depending on your workflow and goals.
Option 1: Design freely, then convert to meshes
You can model using Breps or meshes and convert everything at the end using components such as MeshBrep. While this approach is fast and flexible, it comes with two significant risks:
-
Visual Inconsistency: Automatic conversions often produce uneven triangulation, inconsistent shading, or unpredictable vertex normals. These "glitches" usually only become visible once materials and lighting are applied in the viewer.
-
Performance Bottlenecks: Depending on your document's tolerance settings, the resulting mesh density can be difficult to control.
To gain better control over this process, use the ShapeDiver Tolerance Settings component. This allows you to globally manage the precision of your definitions, balancing visual smoothness with web performance.
Option 2: Design meshes with intention
For visualisation-focused workflows, it is usually better to design with meshes in mind from the start rather than treating them as a final conversion step.
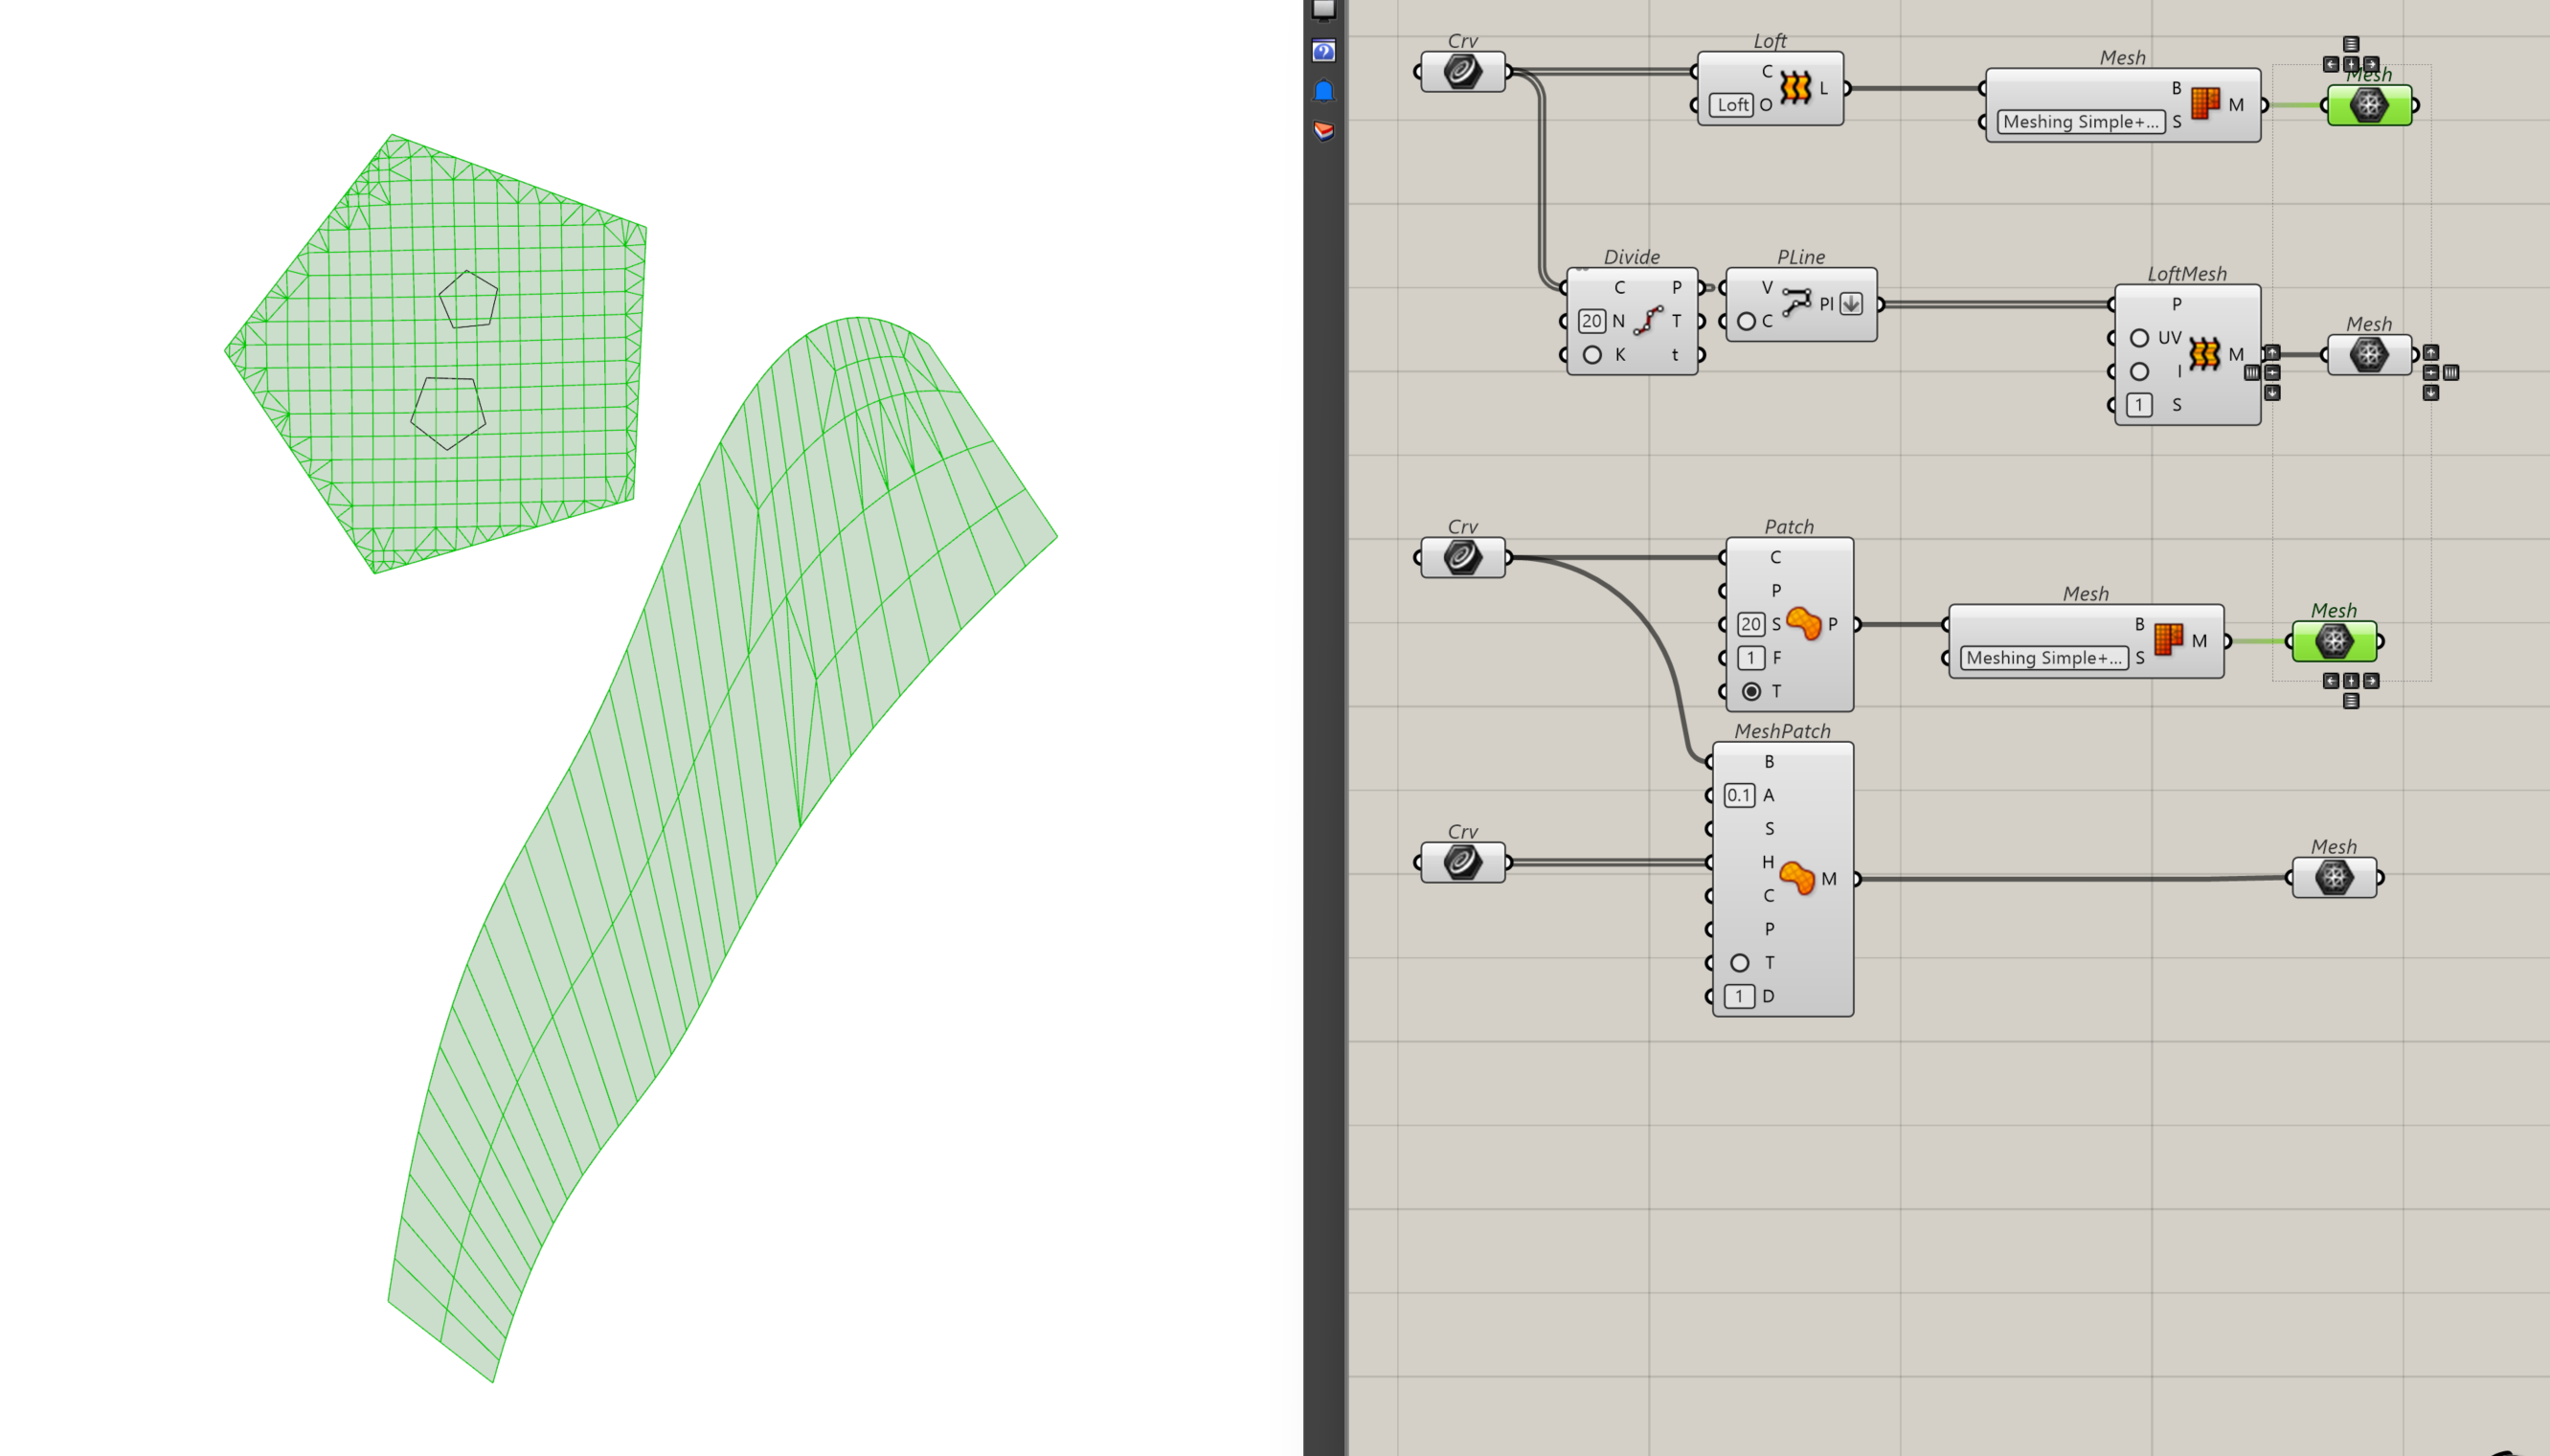
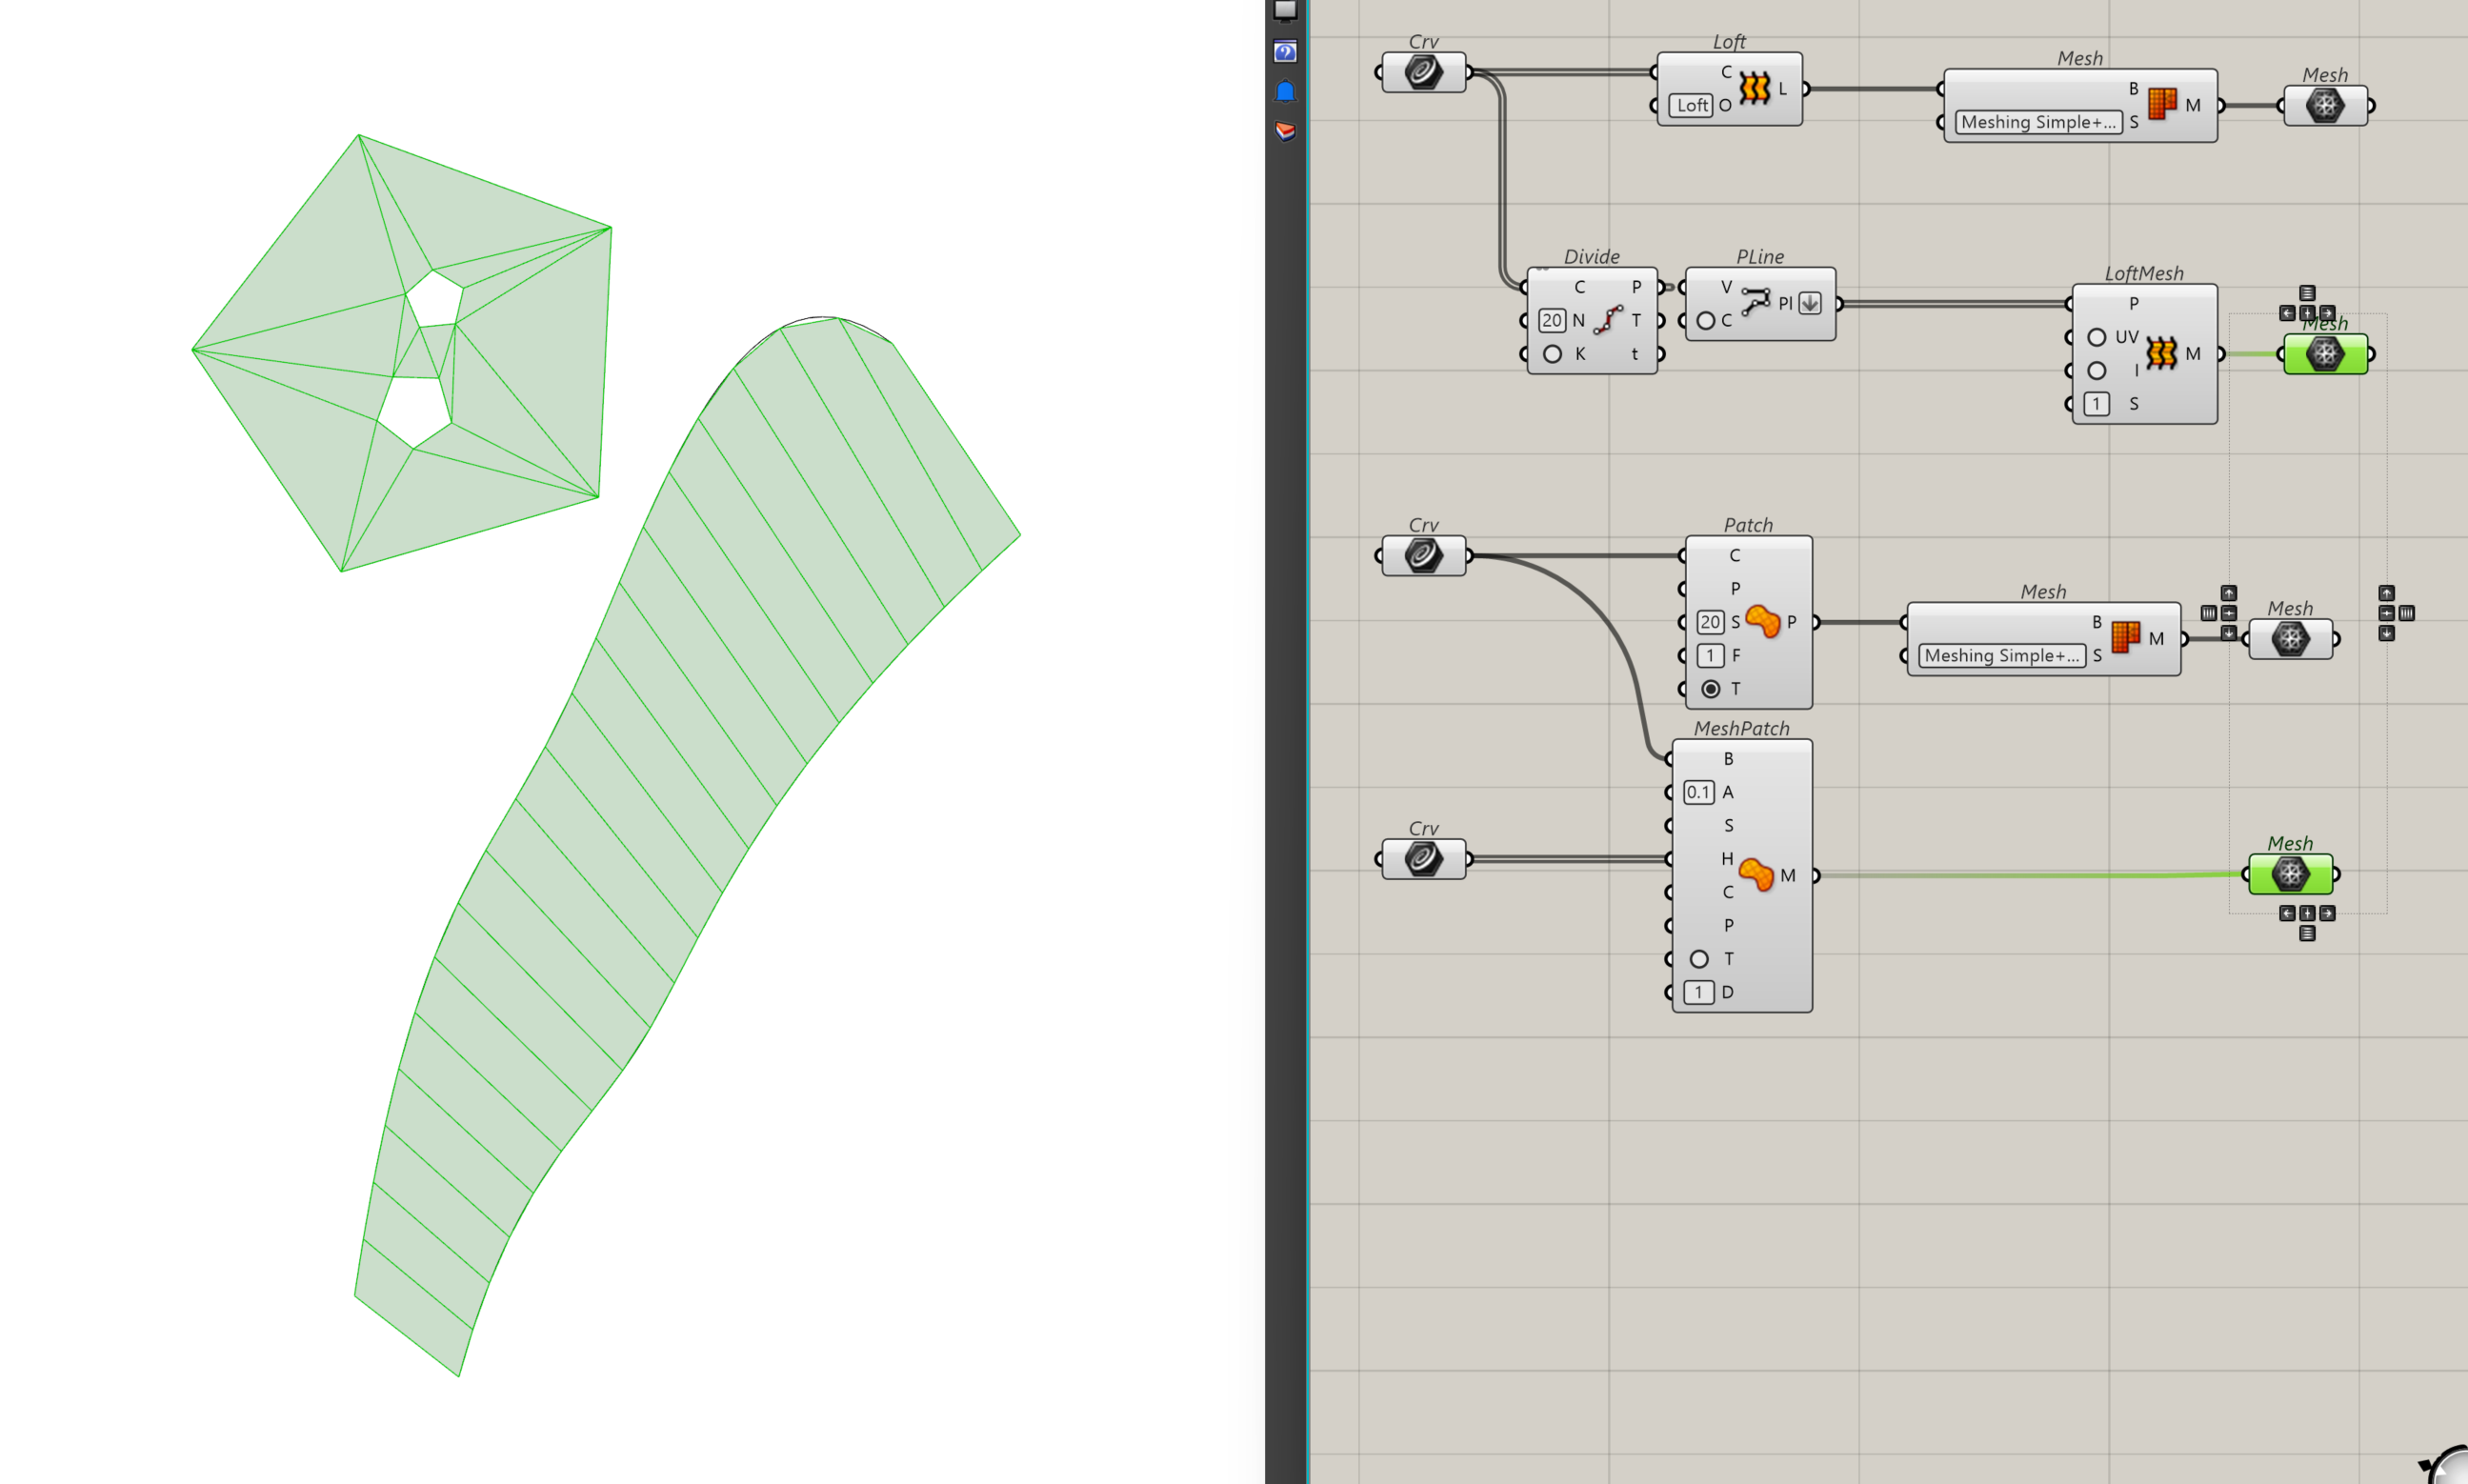
ShapeDiver provides dedicated tools to help you generate meshes directly, rather than converting them later. Those include:
-
Loft Mesh – creates meshes that follow polylines with clean topology
-
Mesh Patch – generates controlled mesh surfaces from boundary curves, including hole boundaries, inner curves.
Enabling Display → Preview Mesh Edges in Grasshopper allows you to quickly assess mesh density, triangulation patterns, and potential problem areas.
Welding and Vertex Normals
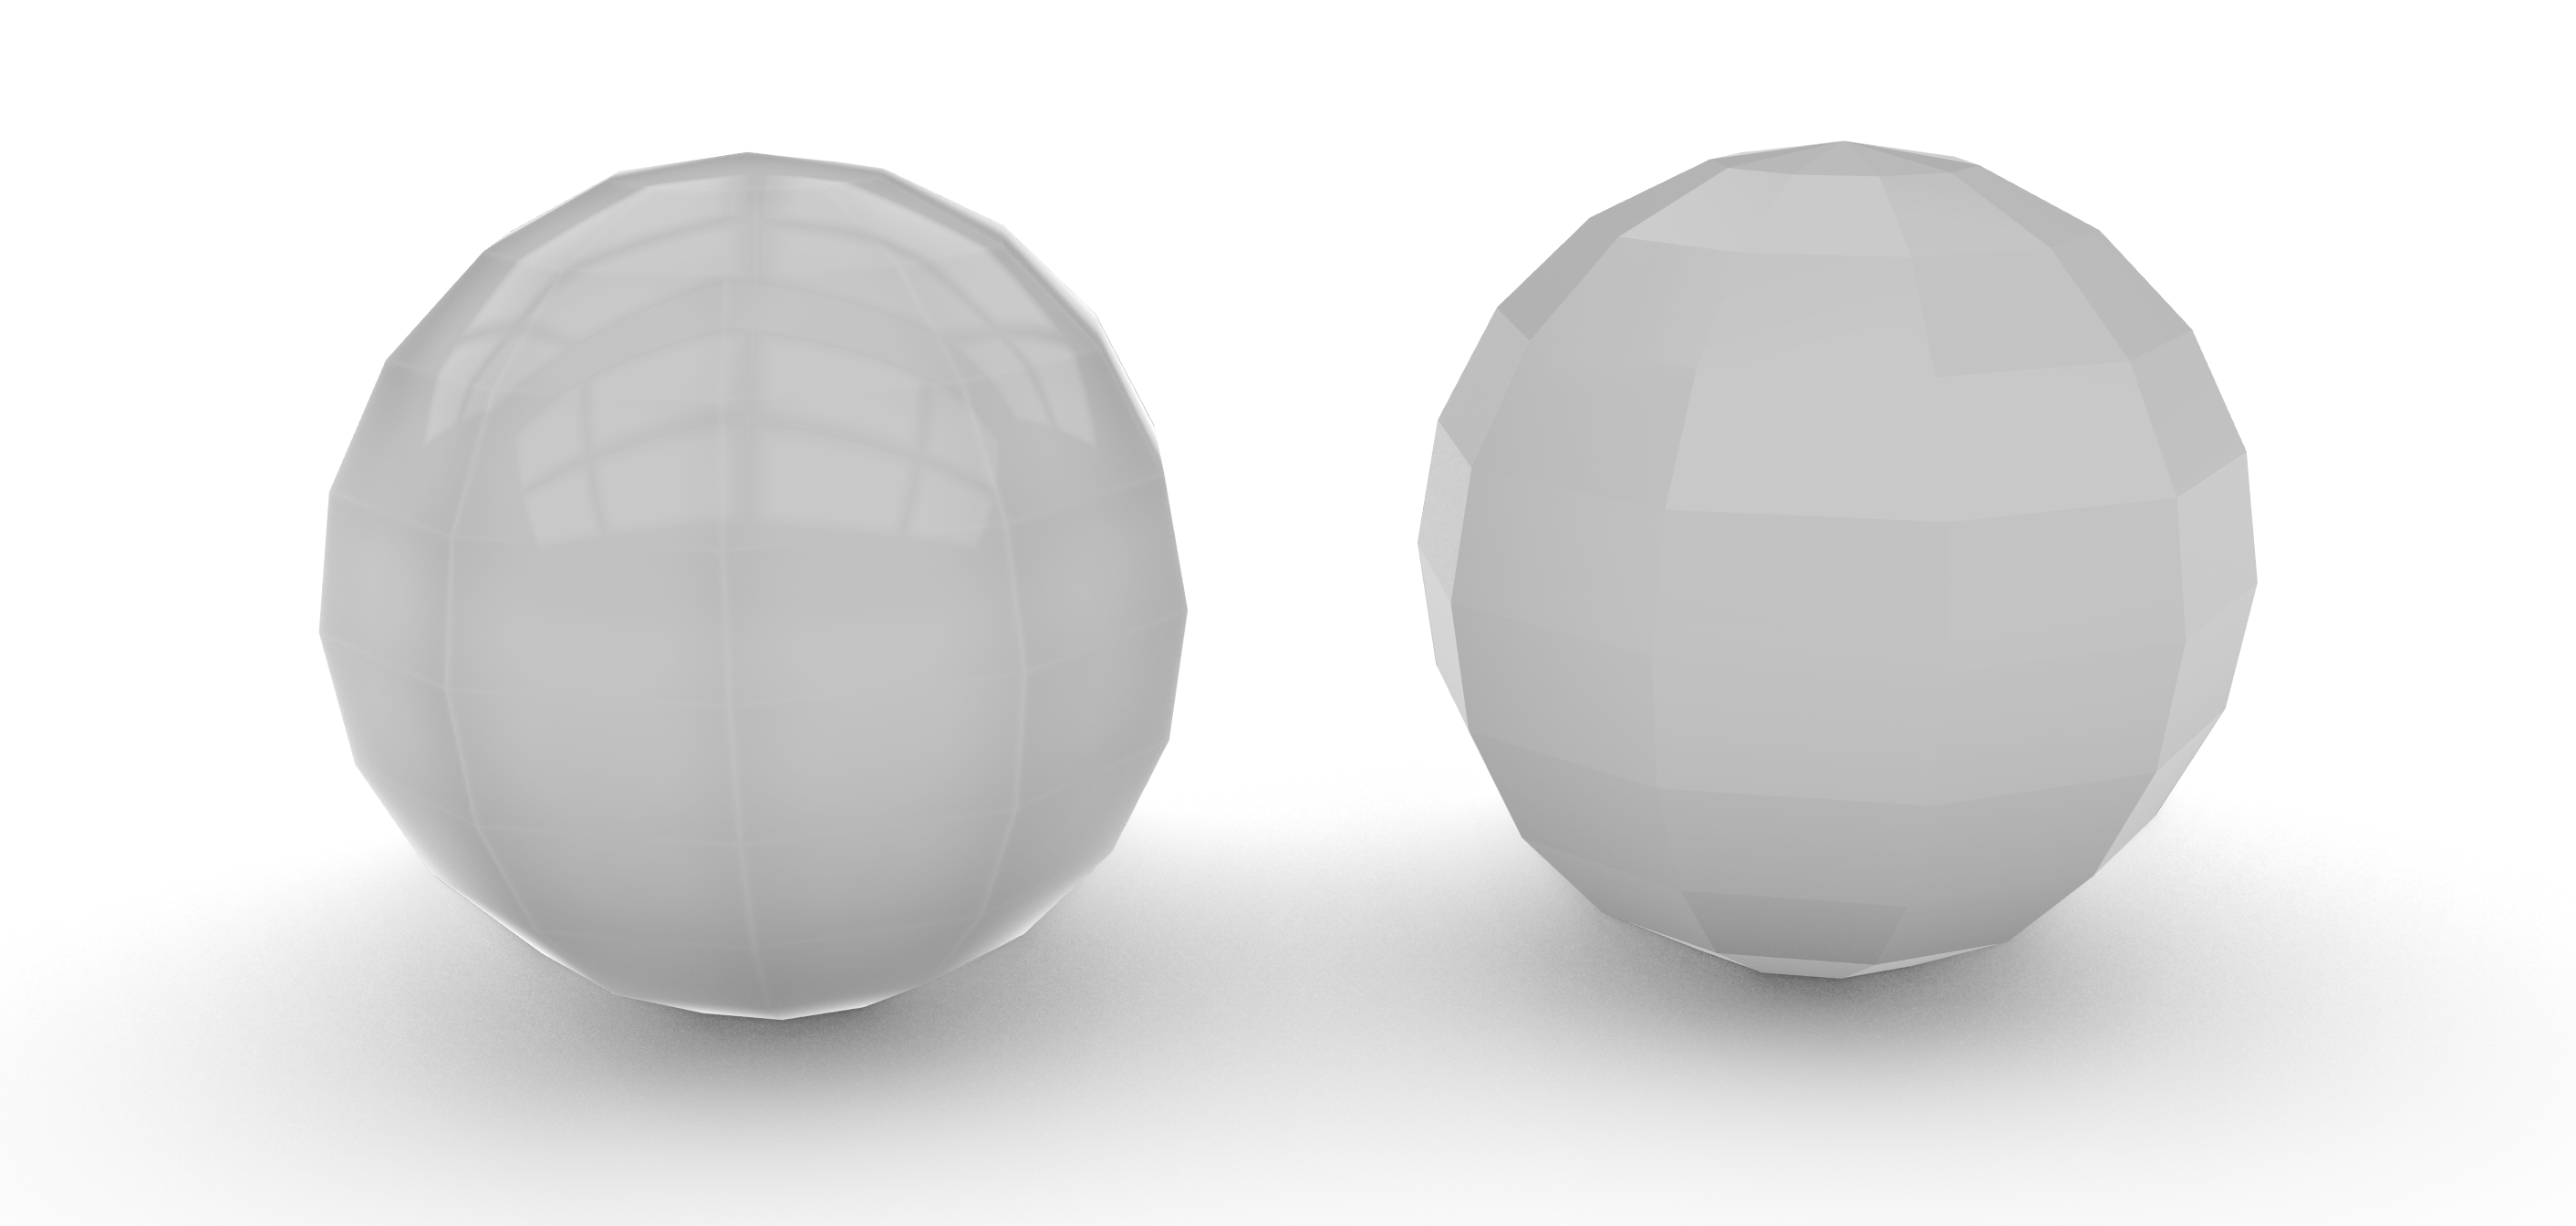
Once your mesh topology is under control, the next crucial step is to check the vertex normals. Vertex normals determine how light flows across a surface and directly affect how smooth or faceted a model appears to the viewer.
When vertices are welded, neighbouring faces share vertex normals. This creates smooth shading and continuous light transitions across the surface.
When vertices are unwelded, each face has its own normal. This results in sharp edges and visible faceting, which can look harsh or unintentional once lighting and materials are applied.
You can use Weld and Unweld Grasshopper components to control this difference.
Visual Artefacts
Very small geometry and overlapping faces can cause visible rendering artefacts, experienced as flickering or “glitching” surfaces. These issues are usually not material-related but are a result of geometric precision. To avoid this, ensure that your geometry is created with a sensible tolerance and that faces do not overlap or sit extremely close to one another. Cleaning up intersections and avoiding unnecessarily small details helps the renderer interpret surfaces correctly.
After uploading your model to ShapeDiver, enabling anti-aliasing in the viewer can further reduce edge flickering.
Finally, perfectly sharp corners often look unnatural in real-time rendering. Adding small fillets or softened edges can improve realism.
External Display
An external display component allows you to add additional models to the ShapeDiver viewer without passing them through the Grasshopper definition, which can improve performance and simplify workflows.
Texture Mapping
Goal: Textures don’t stick automatically — mapping tells them where to go.
Even with clean geometry and good materials, a model will not look right unless textures are mapped correctly. Texture mapping defines how a 2D image is placed onto a 3D surface, controlling scale, orientation, and continuity. Without proper mapping, textures may appear stretched, misaligned, or inconsistent across surfaces.
What UV Mapping Is
Texture mapping relies on UV coordinates, which describe how a flat image is wrapped onto a three-dimensional object.
A useful way to think about UV mapping is like wrapping paper around an object. The object needs to be “unwrapped” into a flat layout so that the image knows exactly where to appear on the surface. If the unwrap is distorted or inconsistent, the texture will be distorted as well.
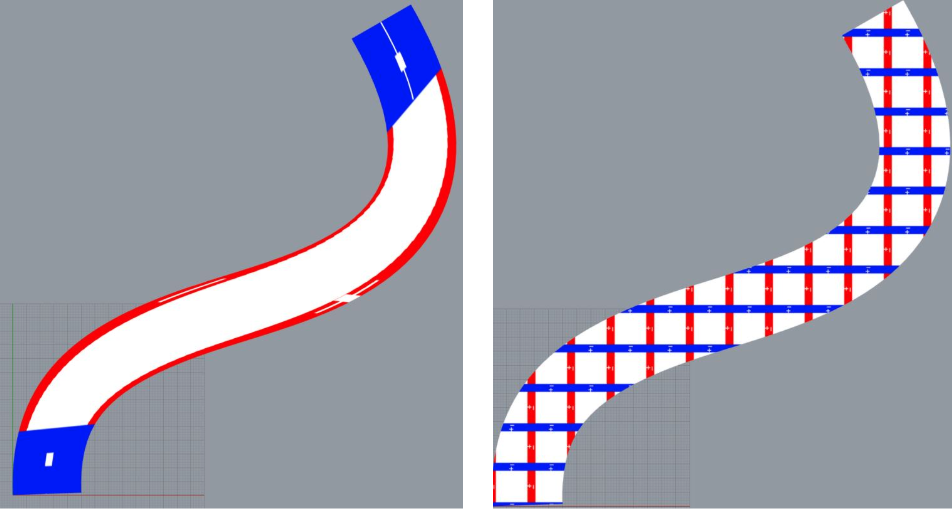
The Checker Ritual
Before applying any real materials, it is strongly recommended to start with a checker texture (example). It acts as a diagnostic tool and immediately reveals common mapping issues, such as: texture stretching, visible seams or incorrect texture scale.
If the checker pattern looks uniform and consistent across the geometry, the texture mapping is likely correct. If not, mapping should be adjusted before moving on to materials.
Native Texture Mapping
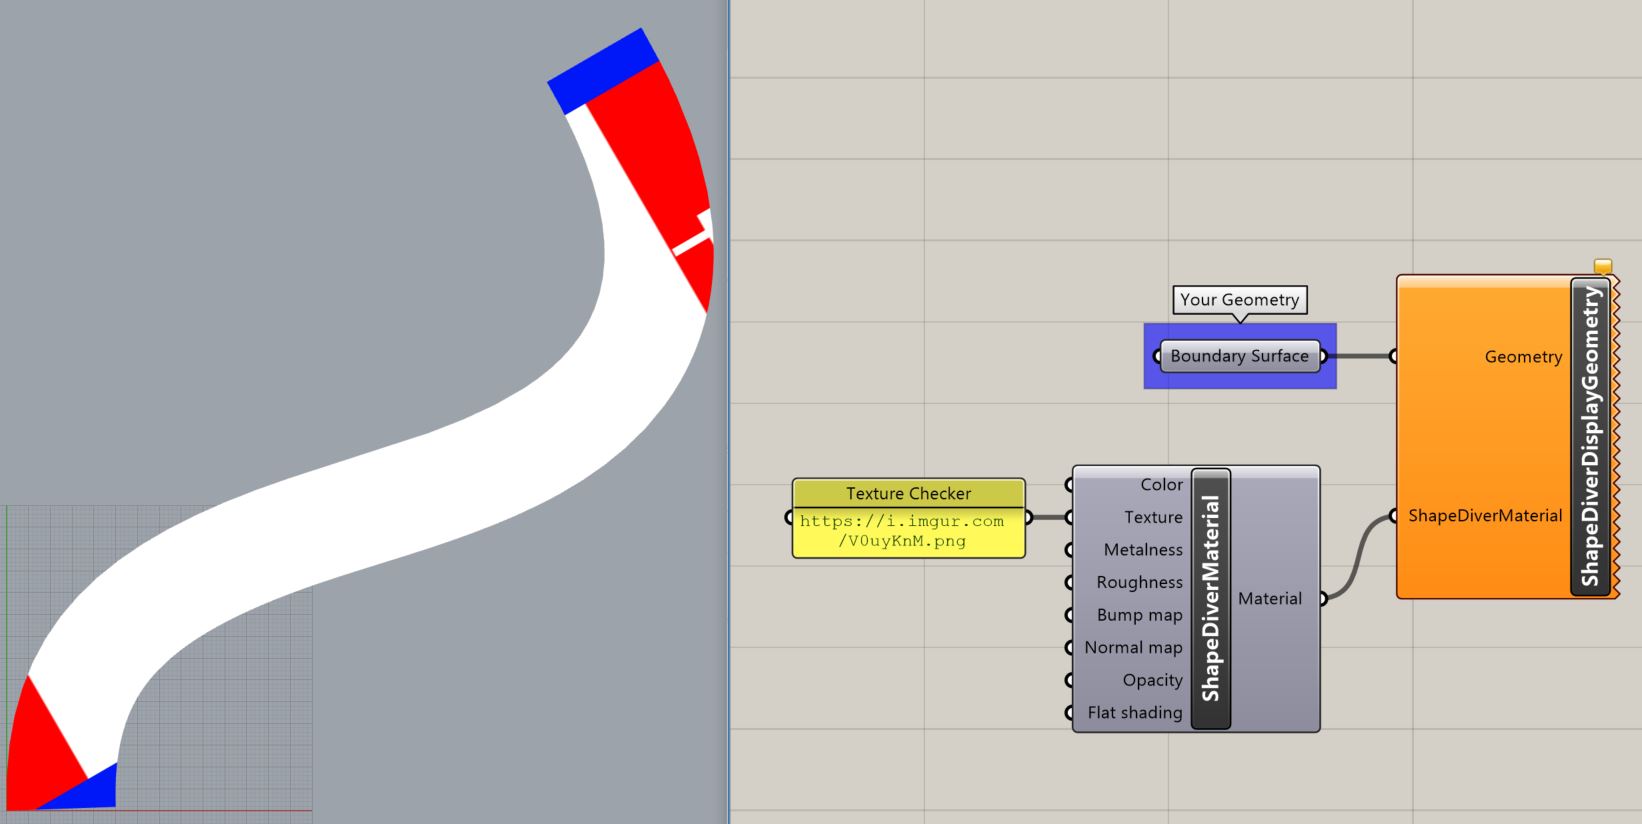
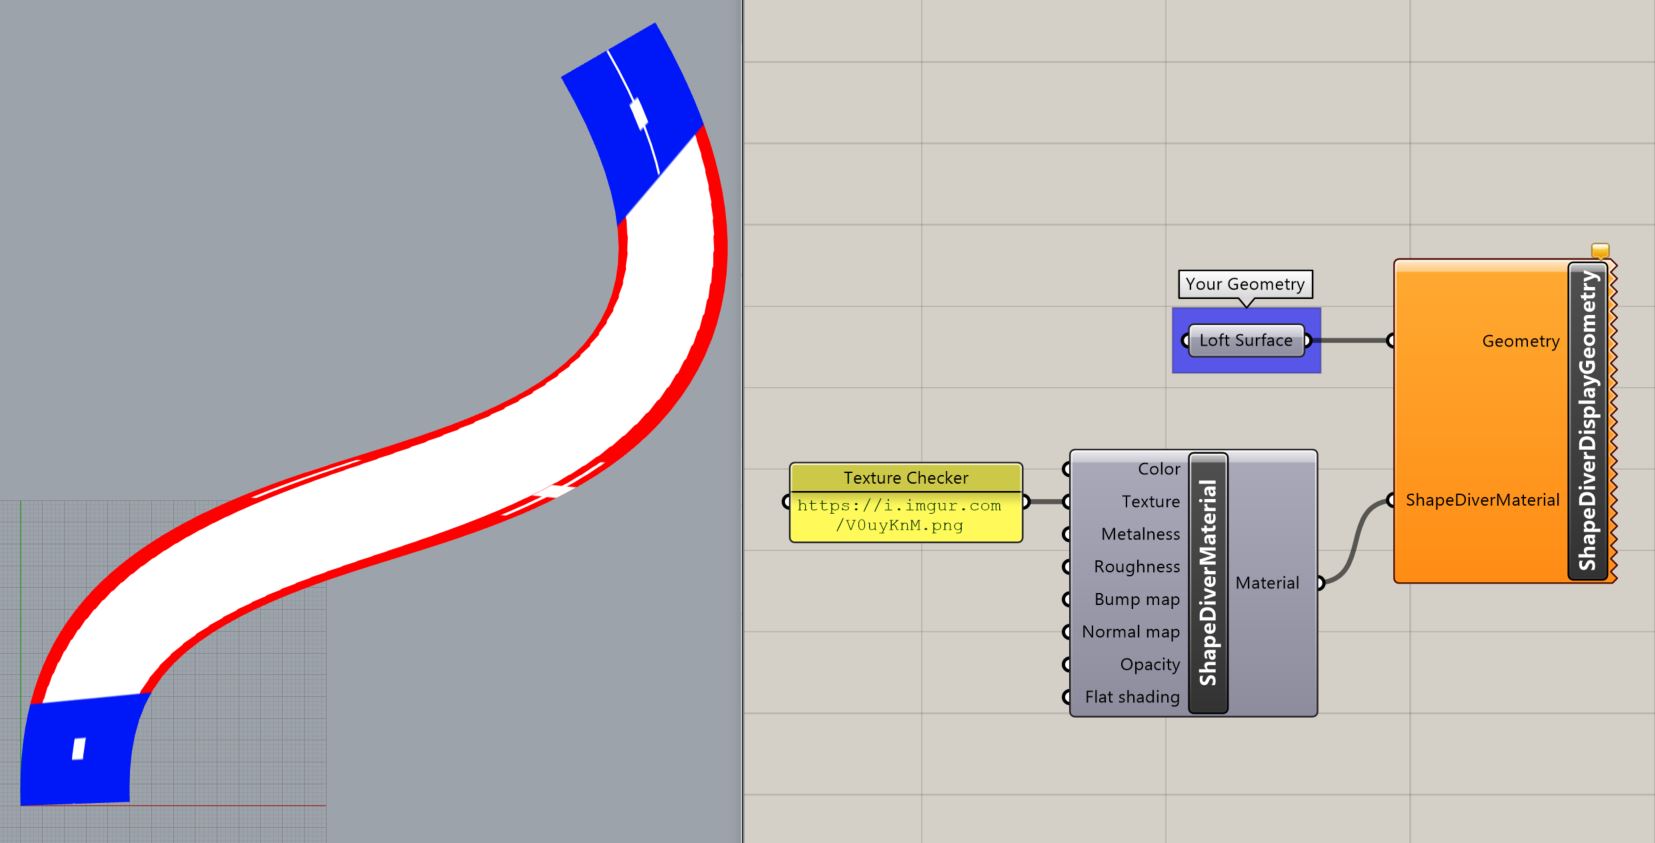
Some Grasshopper components generate texture coordinates during the geometry creation process. For example, Loft, Sweep, Ruled Surface, and some primitive object components generate texture coordinates that follow the shape of the geometry.
When working with mesh-based tools such as ShapeDiver Loft Mesh and Mesh Patch , UV coordinates are typically generated in a way that already suits visualisation workflows, and often require little or no adjustment.
|
|
Fixing Broken UVs
Automatic UV generation does not always produce usable results. Complex geometry, transformations, or conversions between Breps and meshes can lead to distorted or missing UVs.
In these cases, UVs need to be explicitly reassigned. The Human plugin provides texture-mapping components that can be used to define or override existing texture coordinates.
When defining or correcting UVs, different mapping patterns can be used depending on the geometry: Planar, Box, Surface, Cylindrical or Spherical. For greater control, the Human Plugin CustomMapping component lets you define custom mapping patterns tailored to specific geometries.
Transforming Textures Separately from Geometry
Textures can be adjusted without changing the geometry. Common texture transformations include: Move, Rotate, Scale. These can be combined with a Compound Transform component and applied using the Transform Texture UV component.
This component also supports randomising textures along the X and Y axes, which helps reduce visible repetition in patterned materials.
Materials
Even with clean geometry and correct texture mapping, a model will still look flat without properly defined materials.
It is important to remember that ShapeDiver materials are not fully visible in the Rhino viewport. The final appearance depends on the ShapeDiver renderer. After assigning materials, upload your model and review it directly in the ShapeDiver viewer.
Material Presets
The simplest way to improve your model’s appearance is to start with ShapeDiver Preset Material component. The material will be visible once you upload your model to ShapeDiver.
Custom Materials
ShapeDiver uses Physically Based Rendering (PBR) materials. A complete overview of this approach is out of the scope of our documentation, but you can find more information in our Viewer Help Center or here: 3d studio easy explanation or Microsoft advanced explanation.
To apply a custom material, use the ShapeDiver glTF 2.0 Material component.
Materials are instructions for light, not just colours.
High-quality textures are widely available online. Common sources include:
The quality of your materials depends heavily on the quality of your texture maps. Please keep in mind:
- Textures should be tileable (seamless), meaning they can be repeated without visible seams.
You can test textures using tools such as: https://www.patterned.ai/seamless-checker - Perfect surfaces often look artificial. Good textures include subtle imperfections such as colour variation, minor scratches, and uneven roughness. These details make materials feel more believable in real-time rendering.
- Textures should be optimised for web performance. Large images increase loading time and reduce responsiveness. Usually, 512x512 or 1024x1024 pixel sizes are more than enough. For best compatibility and efficiency, texture sizes should follow the “power of two” pixel rule: 8, 16, 32, 64, 128, 256, 512, 1024...
Viewer Setup
To get the most out of the ShapeDiver Viewer, it’s important to understand what it is—and what it isn't. Broadly speaking, there are two types of rendering: offline rendering (the hyper-realistic frames seen in movies that can take hours to calculate) and real-time rendering (what ShapeDiver uses).
The advantage of real-time rendering is interactivity; you can move, scale, and configure a model instantly. However, because your computer must redraw the scene roughly 60 times per second, the viewer uses clever mathematical "shortcuts" to mimic real-world physics. It is a simulation of light, designed to trick the human eye into seeing depth and texture in a web browser.
To make your "simulation" look as realistic as possible, you can fine-tune the following areas:
Environment (HDRI)
The environment is the most influential setting in the viewer. It acts as a 360-degree light box wrapped around your model, controlling:
-
Overall Lighting Mood: The "time of day" or setting (e.g., studio vs. outdoors).
-
Reflections: What the user sees on glossy or metallic surfaces.
-
Ambient Tone: The subtle colour spill that fills the shadows.
Changing the HDRI alone can dramatically alter how a model looks. ShapeDiver provides several presets, but uploading a custom HDRI is the best way to align the scene with a specific brand or atmosphere. You can also adjust the environment map's brightness or set it as your scene background within the environment settings. When used as a background, adding a blur effect is a great way to enhance the atmosphere without distracting from the model itself.
Lighting
Beyond the HDRI, dedicated light sources allow you to refine your scene. These are typically used to "sculpt" the model, fine-tuning highlights or emphasising specific functional details that might otherwise be lost in the shadows. In the ShapeDiver viewer, you can define light scenes which contain multiple lights.
Ground Plane and Shadows
Shadows are essential for "grounding" an object. Without them, models often appear to "float" awkwardly, making it difficult for users to judge scale and position. Enabling the Ground Plane anchors the object visually, significantly improving depth perception. You can also create a ground mesh in Grasshopper and apply a ground plane texture to better integrate the model into its digital environment.
If you prefer a minimalist look without a visible floor, you can still use Ground Plane Shadows or Contact Shadows. These provide the necessary visual weight without requiring a physical plane in the scene.
Post-processing
ShapeDiver includes post-processing filters to polish the final visual output. These effects are calculated after the 3D scene is rendered to add a layer of realism and depth:
-
Ambient Occlusion (AO): This adds subtle shadowing in areas where surfaces meet or where light is naturally blocked. In the ShapeDiver Viewer, we currently support two different implementations of AO: SSAO and HBAO. It helps create "contact depth," making objects feel more grounded, especially around edges, joints, and intersections.
Tip: Use AO sparingly; excessive settings can make the model look "dirty" or unnaturally dark.
-
Bloom: This adds a soft glow to bright reflections and highlights. It is especially effective for metallic materials or light-emitting surfaces, but should be applied subtly to maintain a professional look.
Cameras
A well-configured camera is vital for a smooth user experience. By defining intentional default viewpoints, you can guide the presentation and ensure the model looks its best the moment it is opened. Setting these "hero shots" prevents users from having to hunt for a good angle. Read more about cameras here.
Final Checklist
Once your model is uploaded and reviewed in the ShapeDiver viewer, it helps to run through a final checklist to ensure everything is set up for a high-quality visual result:
- Geometry
- Geometry is clean and free of overlapping or intersecting faces
- Mesh topology is appropriate for real-time rendering
- Vertex normals are correct, and welding is applied intentionally
- Texture Mapping
- Mapping is consistent and distortion-free
- A checker texture has been used to verify scale, seams, and stretching
- Texture transforms are applied where needed
- Materials
- Materials are assigned correctly to all display geometry
- Custom textures are hosted via publicly accessible URLs
- Key PBR parameters (colour, roughness, metalness, normals, opacity) are configured as intended
- Viewer Setup
- The environment is chosen to support lighting and reflections
- Ground plane and shadows anchor the model
- Ambient occlusion and post-processing are applied subtly for final polish
- Default camera views are set for a strong first impression
With these steps in place, your ShapeDiver models will look more convincing, professional, and visually consistent across web environments.