The Camera Action component creates an Action that controls the camera of the App's viewer: it can switch to a predefined camera, move the camera to a custom position and target, animate the camera along a path of several cameras, or zoom to specific objects of the scene. The Action can be triggered in the App by a button using an Action Control component, or along with specific events in the App (upcoming feature).
The Camera Action works together with three helper components:
-
Camera defines a camera: a predefined camera name, or a camera type with a position and a target.
-
Camera Motion defines how the camera travels to its new state: duration, easing and interpolation.
-
Camera Settings define how users can navigate once a camera is active: field of view, pan / rotation / zoom, restrictions, etc.
A tutorial for this example is available here (11K).
Action types
The Camera Action decides on the type of action from the data it receives. There is no type to select manually:
|
Action type |
Inputs provided |
What happens in the App |
|---|---|---|
|
assign |
One camera defined by a name only (no position and target) |
The viewer switches to this camera. Camera Settings attached to the camera are applied. No Camera Motion is used. |
|
set |
One camera with a position and a target |
The camera moves to the new position and target using the Camera Motion. |
|
animate |
Several cameras (a list) |
The camera travels through all cameras of the list (a camera path) using the Camera Motion. |
|
zoomTo |
Node Names, and no camera |
The active camera zooms to fit the objects matching the node names using the Camera Motion. |
Example
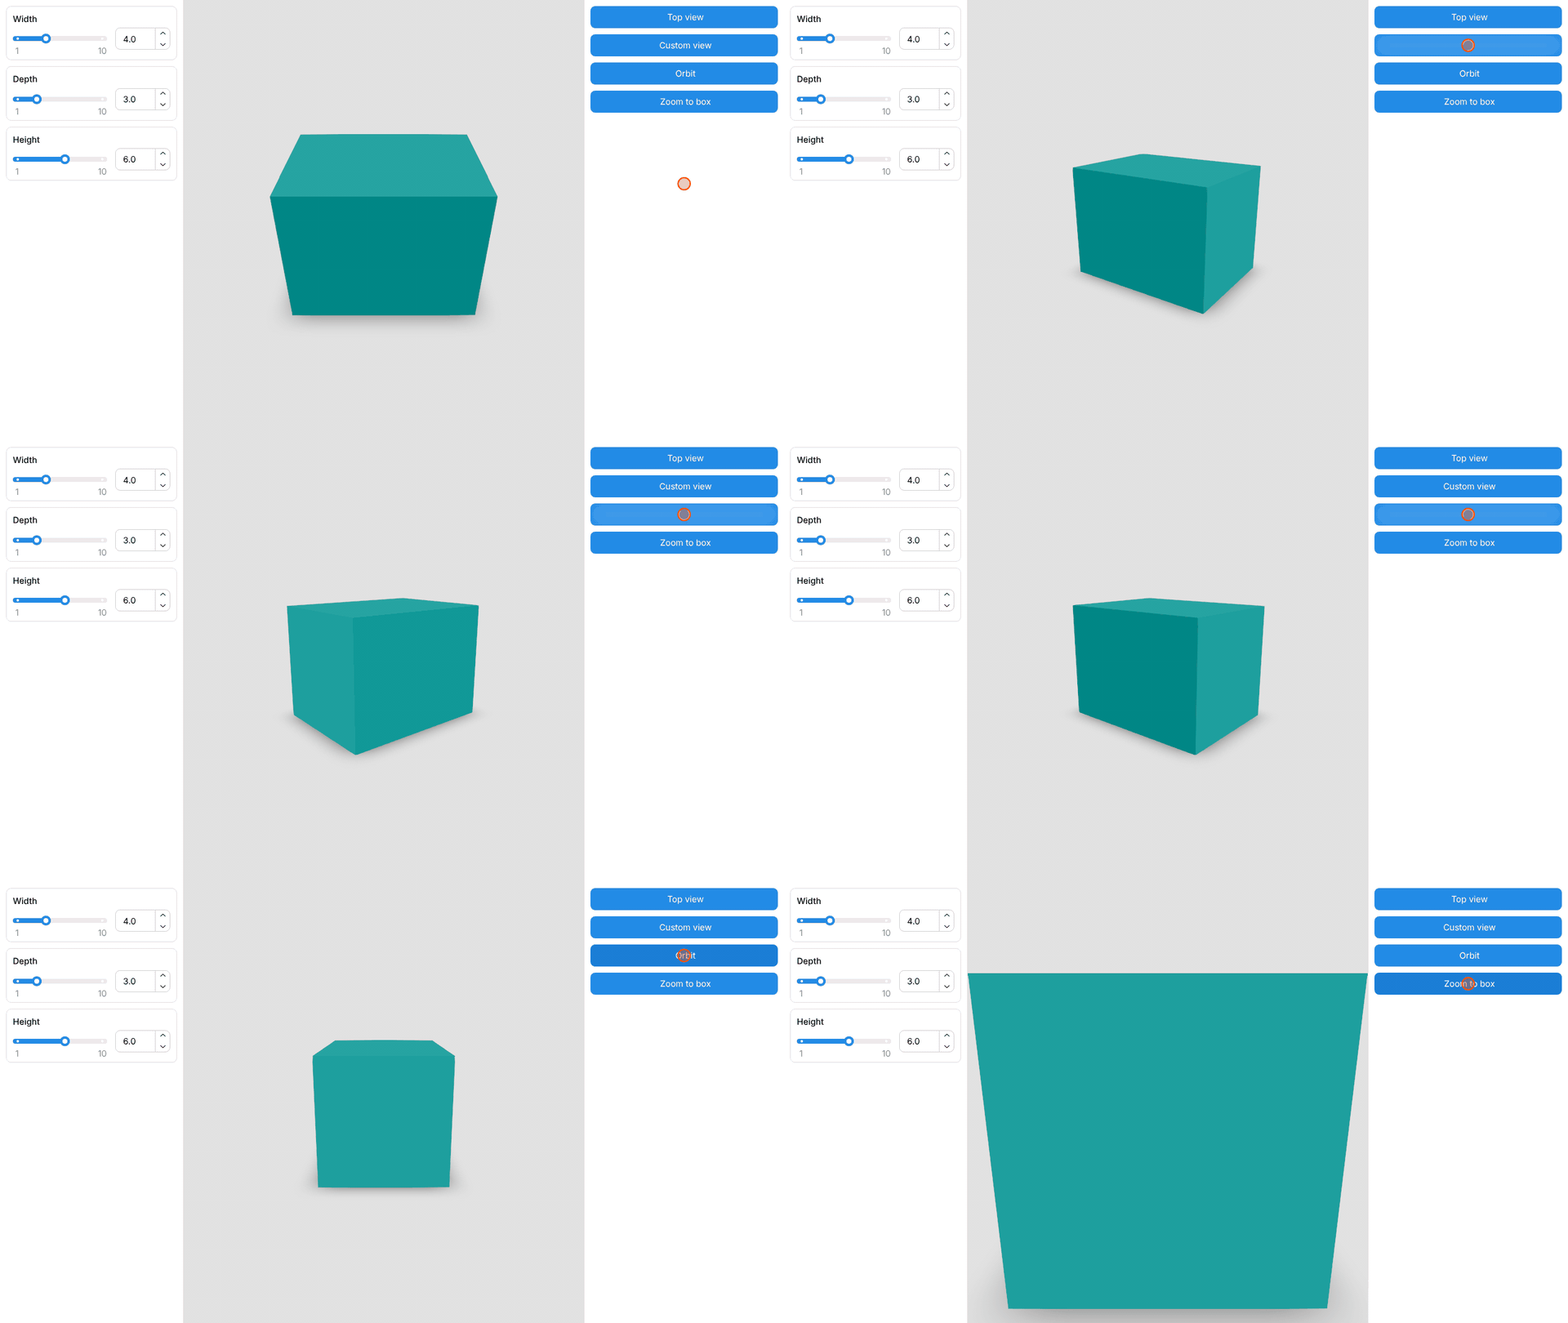
The definition of the 11K tutorial creates a simple box from three sliders ("Width", "Depth" and "Height") and displays it with a glTF 2.0 Display component named "Box". The App contains:
-
a left Container with a Controls Widget showing the three sliders;
-
a right Container with a Controls Widget containing four buttons, each created with an Action Control driven by a Camera Action:
-
Top view (assign): a Camera component receives the name "Top" and Camera Settings disabling rotation, so the top view stays a plan view.
-
Custom view (set): a Camera component receives the type "Perspective", a position and a target (the centre of the box). A Camera Motion of 2 seconds with "Cubic.InOut" easing makes the camera travel smoothly to its new position. The type makes sure that the viewer switches back to the perspective camera after the top view.
-
Orbit (animate): 13 points on a circle around the box are used as camera positions, all looking at the centre of the box. The Camera Action receives the list of cameras and a Camera Motion of 8 seconds with "Linear.None" easing (constant speed) and "CatmullRom" interpolation.
-
Zoom to box (zoomTo): the Node Names input receives "Box", the name of the glTF 2.0 Display component. The active camera zooms to fit the box using the 2-second Camera Motion.
Camera Action
|
Input |
Description |
|---|---|
|
Cameras (C) |
One or several camera definitions created with the Camera component. One camera creates an assign or set action, several cameras create an animate action. Not required if Node Names are provided. |
|
Node Names (N) |
Names of the nodes to zoom to (zoomTo action). See Node names below. |
|
Camera Motion (CM) |
Defines how the camera moves (set, animate and zoomTo actions). See Camera Motion below. |
The output of the Camera Action is connected to the Action input of an Action Control component.
Camera
|
Input |
Description |
|---|---|
|
Camera (C) |
Optional base camera. Accepts a known camera name ( |
|
Type (T) |
|
|
Position (P) |
Location of the camera. |
|
Target (T) |
Point the camera looks at. |
|
Camera Settings (CS) |
Settings to configure camera behaviour, navigation and restrictions. Ignored when no camera name or type is defined (the active camera keeps its own settings). |
Right-click the Camera input and use the ShapeDiver Helpers to pick one of the predefined cameras, or to take the current Rhino viewport camera ("Set Camera in Rhino Viewport").
When several positions are provided, the Camera component creates one camera per position, which can be used as a camera path for an animate action.
Camera Motion
|
Input |
Description |
|---|---|
|
Duration (D) |
Duration of the movement in seconds (0 or greater). |
|
Easing (E) |
How the animation progress changes over time: |
|
Interpolation (I) |
Interpolation through the cameras of an animation: |
The same Camera Motion can be reused by several Camera Actions.
Camera Settings
|
Input |
Description |
|---|---|
|
Field of View (FV) |
Perspective field of view in degrees (between 0 and 180). Only relevant for perspective cameras. |
|
Enable Pan (EP) |
Enables or disables panning. |
|
Enable Rotation (ER) |
Enables or disables rotation. |
|
Enable Zoom (EZ) |
Enables or disables zooming. |
|
Auto Adjust (AA) |
Keeps all scene objects visible after updates. |
|
Auto Rotation Speed (RS) |
Rotation speed of the camera. Negative values reverse the direction. |
|
Position Restriction (PR) |
Box or sphere within which the camera position must remain. |
|
Zoom Distance (ZD) |
Allowed distance between camera position and target, as an interval. |
|
Polar Rotation (PR) |
Allowed vertical rotation range in degrees (within 0 to 180), as an interval. |
|
Azimuth Rotation (AR) |
Allowed horizontal rotation range in degrees, as an interval. |
Node names
The node names used by the zoomTo action refer to the objects displayed by glTF 2.0 Display components:
-
The nickname of the glTF 2.0 Display component is the name of its node, e.g.
Box. -
Objects inside this output can be addressed with
<nickname>.<name>when they carry a "name" attribute (assigned with the ShapeDiver Construct Attributes and Inject Attributes components), e.g.Objects.sphere.
Right-click the Node Names input and use the ShapeDiver Helpers ("Find Nodes", "Zoom to Entire Scene") to fill in node names.
Tips and limitations
-
Types and Camera Settings of an animation are taken from the first camera of the list only. If you need a type (e.g. to make sure the perspective camera is used), only give it to the first camera: split the first position off the list, create a camera with a type for it and merge it back in front of the other cameras.
-
Use a Type in set and animate actions when the App also contains assign actions to other cameras (e.g. a top view), so that the viewer switches back to the right camera.
-
Data trees: when merging the controls of several Camera Actions into one Controls Widget, flatten the Merge inputs, as an animate action built from a list may sit on a deeper data path.